Wednesday, 28 August 2024

Post Method Web API Example

 Insert new record in list.


This method add new employee in list and create response with success status and create URI for new record and add in header of response.

/// <summary>
///
 This Method add new record in list of employee.
/// and create response and allocate uri with id in header of response.
/// </summary>
///
 <param name="emp"></param>
/// <returns></returns>
public HttpResponseMessage PostAddNewEmployee(Employee emp)
{

     if (emp == null)
     {
         
throw new ArgumentNullException();
     }

    _emp.Add(emp);
     
var response = Request.CreateResponse<Employee>(HttpStatusCode.Created, emp);
     
string uri = Url.Link("DefaultApi", new { id = emp.Uid });
     response.Headers.Location = 
new Uri(uri);
      
return response;
}

Now In this step I will explain how to consume HTTP service Web API Post Method in Dot net.

Create a Resource (HTTP POST)

In this method set base address of Asp.Net Web API and sets the accept header to application/json that tells the server to send data in JSON Format.

PostAsJsonAsyn:This method serializes object into JSON format and send POST request to.

After that this method return Response object.

private static HttpResponseMessage ClientPostRequest(string RequestURI,Employee emp)
{
        
HttpClient client = new HttpClient();
        client.BaseAddress = 
new Uri("http://localhost:1379/");
        client.DefaultRequestHeaders.Accept.Clear();
        client.DefaultRequestHeaders.Accept.Add(
new MediaTypeWithQualityHeaderValue("application/json"));
        
HttpResponseMessage response = client.PostAsJsonAsync(RequestURI,emp).Result;
        
return response;
}

Add This code to Main function of program.cs.->Add New Record in List of employee.

In this method create new employee and call above created method and pass employee object as a parameter then receive response from this method then call EnsureSuccessStatusCode method –This method throw exception when response status in not success.

After that check IsSuccessStatusCode true and false and return URL with Newly created employee ID.

//HTTP POST
Console.WriteLine("----------------Add New Employee -------------------");
Employee emp=new Employee(){ Uid=6,Name="Sikha",Address="Agra",City="agra"};
HttpResponseMessage responsePostMethod = ClientPostRequest("api/Employee",emp);
responsePostMethod.EnsureSuccessStatusCode();
if (responsePostMethod.IsSuccessStatusCode)
{
      
Uri empUrl = responsePostMethod.Headers.Location;
      
Console.WriteLine(empUrl.ToString());
}

After that you will run your application and see output.
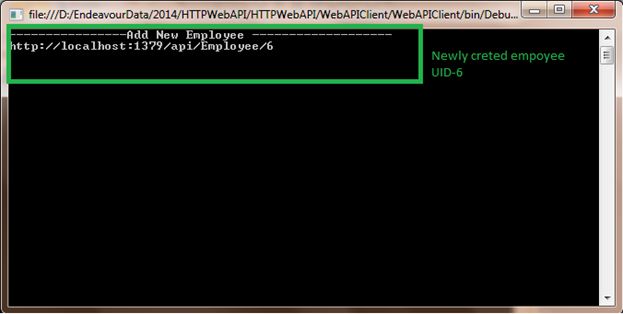
output

Get Method Example Web API


Start with First Web API Project

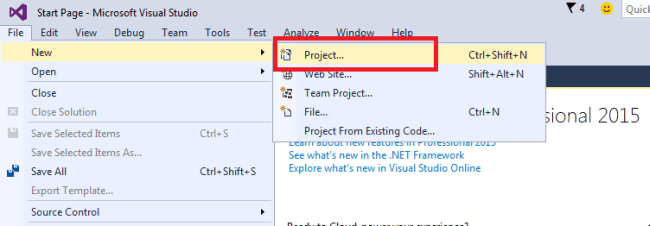
Open Visual Studio (I am using Visual studio 2015) and from the File menu, select New and then click on the Project. It will open a New Project window.

start page 

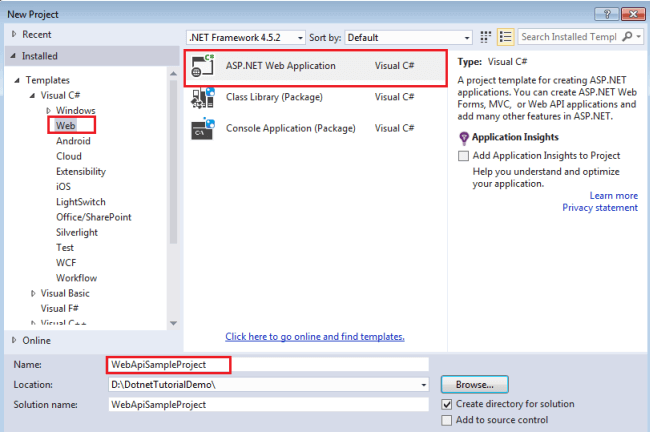
I am using C#, so from the Installed Templates, choose the Visual C# node and under Visual C#, select Web. In the list of project templates, choose ASP.NET Web Application. Give the following name to the project, "WebApiSampleProject" and click OK. It will open a new ASP.NET Project dialog where you can select many types of template for the project.

new project 

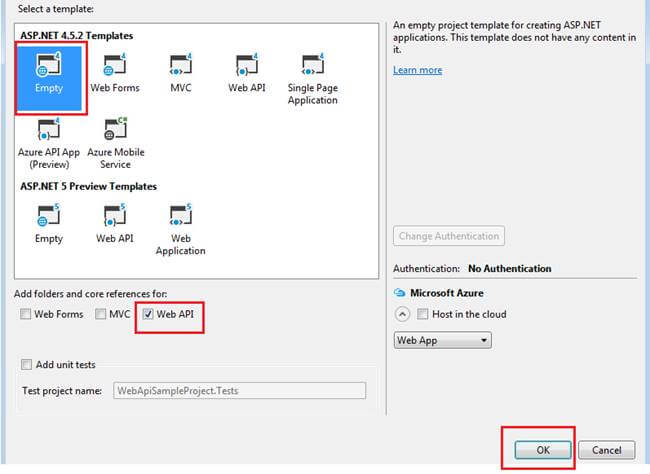
In the new ASP.NET Project dialog, select the Empty template and check Web API. Click OK.

select template 

So, finally you have created a Web API project. It will create a default structure for the project.

solution explorer 

Add a model class

Model represents the data. It is an object of your data. The model contains all application logic such as business logic, validation logic, data access logic, etc. Web API can automatically serialize the model data to JSON, XML or some other format. The serialize data write into the body of HTTP response message. Client can access the data after de-serialization.

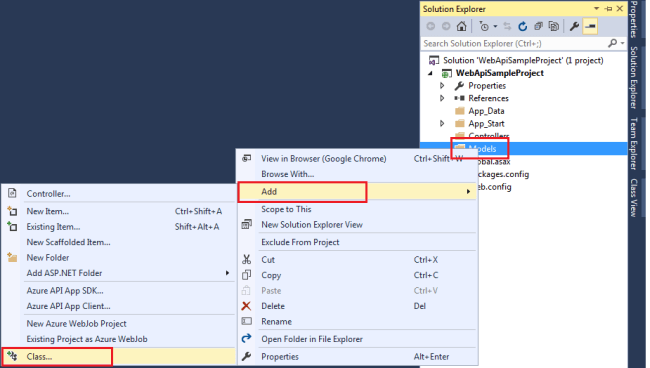
To add new model class, in the Solution Explorer, right click on the Models, select Add and Class.

add new model class 

It will open a dialog for Add New Item, select Visual C# node and select Class and give the proper name “Employee” for the model class and select Add. Modify the code for the model as below:

namespace WebApiSampleProject.Models
{
    public class Employee
    {
        public int EmployeeId
        {
            get;
            set;
        }
        public string EmployeeName
        {
            get;
            set;
        }
        public string Address
        {
            get;
            set;
        }
        public string Department
        {
            get;
            set;
        }
    }
}
C#

Add a controller

Web API Controller is responsible for handling all HTTP requests which can come from browser, mobile device, desktop web application or any other.

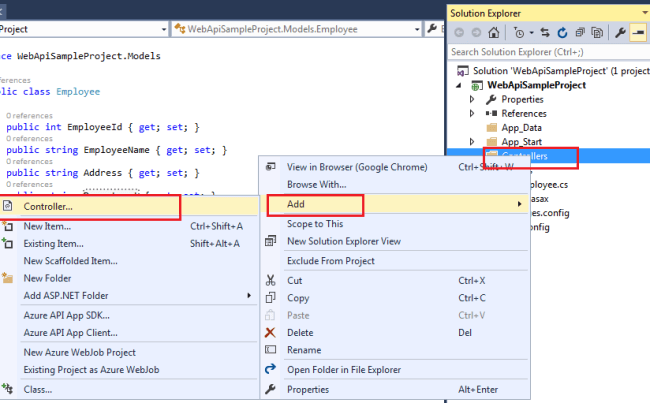
In Solution Explorer, right click the Controllers folder and select Add and then select controller. 

Add controller 

Note: Web API controller inherits the ApiController class instead of the Controller class.

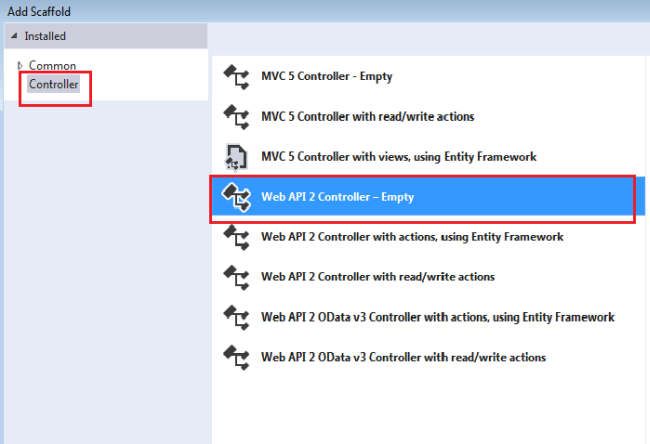
It will open Add Scaffold dialog, select the Web API Controller - Empty template and click on Add.

Add scaffold 

In the Add Controller dialog, give a proper name to the controller, "EmployeeController" and click on Add.

Add controller 

You will see scaffolding creates an “EmployeeController.cs” class inside the controller folder.

Add two methods in the controller “GetAllEmployees” and “GetEmployeeDetails” and make dummy data for the Employee. See the following code:

using System;
using System.Collections.Generic;
using System.Linq;
using System.Net;
using System.Net.Http;
using System.Web.Http;
using WebApiSampleProject.Models;
namespace WebApiSampleProject.Controllers
{
    public class EmployeeController: ApiController
    {
        IList < Employee > employees = new List < Employee > ()
        {
            new Employee()
                {
                    EmployeeId = 1, EmployeeName = "Mukesh Kumar", Address = "New Delhi", Department = "IT"
                },
                new Employee()
                {
                    EmployeeId = 2, EmployeeName = "Banky Chamber", Address = "London", Department = "HR"
                },
                new Employee()
                {
                    EmployeeId = 3, EmployeeName = "Rahul Rathor", Address = "Laxmi Nagar", Department = "IT"
                },
                new Employee()
                {
                    EmployeeId = 4, EmployeeName = "YaduVeer Singh", Address = "Goa", Department = "Sales"
                },
                new Employee()
                {
                    EmployeeId = 5, EmployeeName = "Manish Sharma", Address = "New Delhi", Department = "HR"
                },
        };
        public IList < Employee > GetAllEmployees()
        {
            //Return list of all employees
            return employees;
        }
        public Employee GetEmployeeDetails(int id)
        {
            //Return a single employee detail
            var employee = employees.FirstOrDefault(e => e.EmployeeId == id);
            if (employee == null)
            {
                throw new HttpResponseException(Request.CreateResponse(HttpStatusCode.NotFound));
            }
            return employee;
        }
    }
}
C#

In the above controller you can see that the method “GetAllEmployees” return the list of all employees and the method “GetEmployeeDetails” returns the detail of single employee. See the following chart which shows how controller use route URL to perform action.

Controller MethodRoute URI
GetAllEmployees/api/employee
GetEmployeeDetails/api/employee/id

Run the Web API

To see the result, you can just create a client application which will use this web API or you can just simply press F5 or Ctrl+F5. It will open the browser with Url like http://localhost:53037/

To get all employees list, you need to make changes in the Url such as http://localhost:53037/api/employee.

To get the details of single employee, you need to pass the employee id in the Url http://localhost:53037/api/employee/4

Thanks for reading this article, hope you enjoyed it.