Tuesday, 29 October 2024

Memory Optimized Tables In SQL Server

Server-Side Caching with Memory-Optimized Tables

SQL Server 2014 introduces the In-memory OLTP engine which is fully integrated in SQL Server and allows you to create memory optimized tables. These memory optimized tables have a completely different data and index structure with no locking or latching required when you access the data. This design results in a minimal amount of waiting time and no blocking. Data for the memory optimized tables gets stored in memory in a completely different structure and there are no data pages or index pages or buffer pool for memory optimized tables.

There are two types of indexes which can be created on memory optimized tables, namely a HASH index or RANGE index. A memory-optimized table must always have at least one index, although if you create a primary key on the table, this requirement will be satisfied. You can create up to 8 indexes on a memory optimized table including the one supporting the primary key although no unique index is supported other than the primary key.

All 8 indexes can only be non-clustered indexes. These indexes don't duplicate data, but rather they just point to the rows in the chain. These indexes are not logged and don't get stored on disk.   The indexes are maintained online and created every time during recovery.


 Problem with Caching : if your data is volatile and being updated from multiple clients or applications, then caching can create as many problems as it solves because the data held at each of the individual clients can be different. In that scenario, it becomes difficult to determine what the "right" data is.

Wednesday, 23 October 2024

Using REDIS Cache with C#

 this case a key-value NoSQL type. See this article for more information about different types of NoSQL databases.

 
Redis is a NoSQL key-value cache that stores the information in a hash table format, providing the possibilities to store different types of structured data like strings, hashes, lists, sets, sorted sets, bitmaps and hyperloglogs.
 
Installing REDIS on Windows
 
Officially Redis doesn't have an official version for windows, but being an open-source project, there is a fork by MSOpenTech where there is the possibility of running Redis on Windows.
 
 Requirements to install Redis:
  1.  64 bit OS
  2. The windows package manager Chocolatey
In order to install Redis on Windows using Chocolatey, we need to run a simple command with the command prompt (as administrator) and just follow the instructions:
  1. C:\> choco install redis-64  
Once the installation is complete, we can run the Redis server instance using the command redis-server.exe. If you have problems running the command and get the error "redis-server is not recognized as an internal...etc" is because chocolatey failed registering the system path variable indicating where Redis is. You can fix it with the following command:
  1. SET PATH=%PATH%;"c:\Program Files\Redis"  
Now we can run the redis-server.exe to start our redis instance.
 
Connecting using C#
 
I will be using Visual Studio 2015 Community Edition and I'm sure you already have it, if not you can download it from here.
 
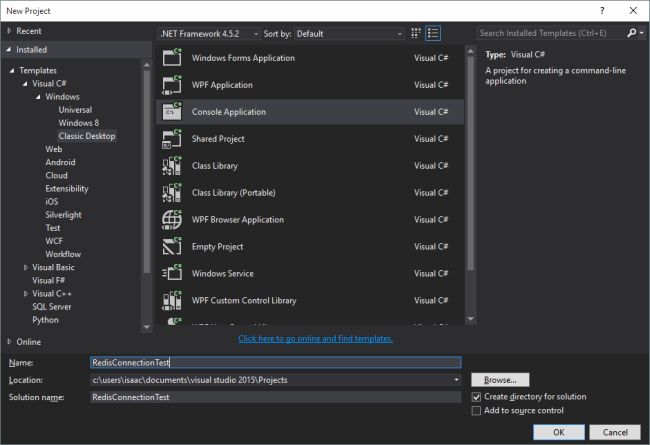
We are going to create a Console Application using .Net 4.5 or higher (this is important) naming the project RedisConnectionTest:
 
console application
 
Having this empty project, we need a Nuget package that is our connector to redis(StackExchange.Redis). Using the Visual Studio tools, we add this Nuget package:


Once this package is installed, we are going to create a new class named RedisConnectorHelper.cs. In order to have an easy way to manage our connection to redis, we type the following: 
  1. public class RedisConnectorHelper  
  2. {                  
  3.     static RedisConnectorHelper()  
  4.     {  
  5.         RedisConnectorHelper.lazyConnection = new Lazy<ConnectionMultiplexer>(() =>  
  6.         {  
  7.             return ConnectionMultiplexer.Connect("localhost");  
  8.         });  
  9.     }  
  10.       
  11.     private static Lazy<ConnectionMultiplexer> lazyConnection;          
  12.   
  13.     public static ConnectionMultiplexer Connection  
  14.     {  
  15.         get  
  16.         {  
  17.             return lazyConnection.Value;  
  18.         }  
  19.     }  
  20. }  
The connection to Redis is handled by the ConnectionMultiplexer class. To connect to the redis instance we use the static method ConnectionMultiplexer.Connect, that takes a string parameter with the connection string.
 
ConnectionMultiplexer
 was designed for code sharing by the whole application, is not necessary to create a new instance every time you need a simple operation. Creating a new instance every time we need a cache, the performance may be affected. In addition, if we are using Redis cache from Azure, there is a limit connection so if we create a new connection each time we need the cache, this limit can be exceeded.
 
An easy way to share the Multiplexer instance is using a static property. This class was designed to be used like this, singleton and thread-safe.
 
Setting and Getting data from the cache
  1. class Program  
  2. {  
  3.     static void Main(string[] args)  
  4.     {  
  5.         var program = new Program();  
  6.   
  7.         Console.WriteLine("Saving random data in cache");  
  8.         program.SaveBigData();  
  9.   
  10.         Console.WriteLine("Reading data from cache");  
  11.         program.ReadData();  
  12.   
  13.         Console.ReadLine();  
  14.     }  
  15.   
  16.     public void ReadData()  
  17.     {  
  18.         var cache = RedisConnectorHelper.Connection.GetDatabase();  
  19.         var devicesCount = 10000;  
  20.         for (int i = 0; i < devicesCount; i++)  
  21.         {  
  22.             var value = cache.StringGet($"Device_Status:{i}");  
  23.             Console.WriteLine($"Valor={value}");  
  24.         }  
  25.     }  
  26.   
  27.     public void SaveBigData()  
  28.     {  
  29.         var devicesCount = 10000;  
  30.         var rnd = new Random();  
  31.         var cache = RedisConnectorHelper.Connection.GetDatabase();  
  32.   
  33.         for (int i = 1; i < devicesCount; i++)  
  34.         {  
  35.             var value = rnd.Next(0, 10000);  
  36.             cache.StringSet($"Device_Status:{i}", value);  
  37.         }  
  38.     }  
  39. }  
With the SaveBigData method we save 10,000 items with random values between 0 and 10,000. The important here is how we use our helper connection class.
 
We use the method GetDatabase from the Multiplexer to access the cache. This instance has too many methods: can read, save, delete, increase data, concatenate and finally, all the commands that Redis has. We use StringSet to save a string (or any primitive type) using the "Device_Status: NUMBER" as a key.
 
Comment the line number 10 and 11 and run the application, you are going to see something similar to this (left window):
 
 
The operation of Redis is to have everything in memory and depending on certain rules, it will save everything to the hard disk.
 
To view these random data we just add,  use a totally similar to StringSet method: StringGet.
 
Uncomment the lines 10-11 and comment the lines 07-08 and run again the console application, you will see the following (left window):
 
 
This is how we connect to Redis using the StackOverflow framework (the NuGet package) and get&set some random items to the cache with disk persistence.

Tuesday, 22 October 2024

Routing In ASP.NET And ASP.NET MVC With Example


What is Routing?

URL Routing or URL Rewriting is a technique using that we can define user-friendly URL which is useful for Search Engine Optimization (SEO).

Using ASP.NET routing or ASP.NET MVC Routing we can achieve that easily.

Rather than calling a physical File name like 'Home/about.aspx' we can use 'Home/about', User cannot remember files extension like .aspx or .php so we can use Routing and make URL easy to remember for them.

Routing in ASP.NET

Let's create ASP.NET Routing first.

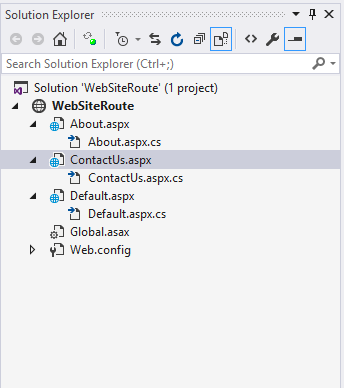
Step 1: Create a new Web Application Project and add 2 pages like Default.aspx and About.aspx.

 ASP.NET Empty Web Site

 Add web form

 Solutions Explorer

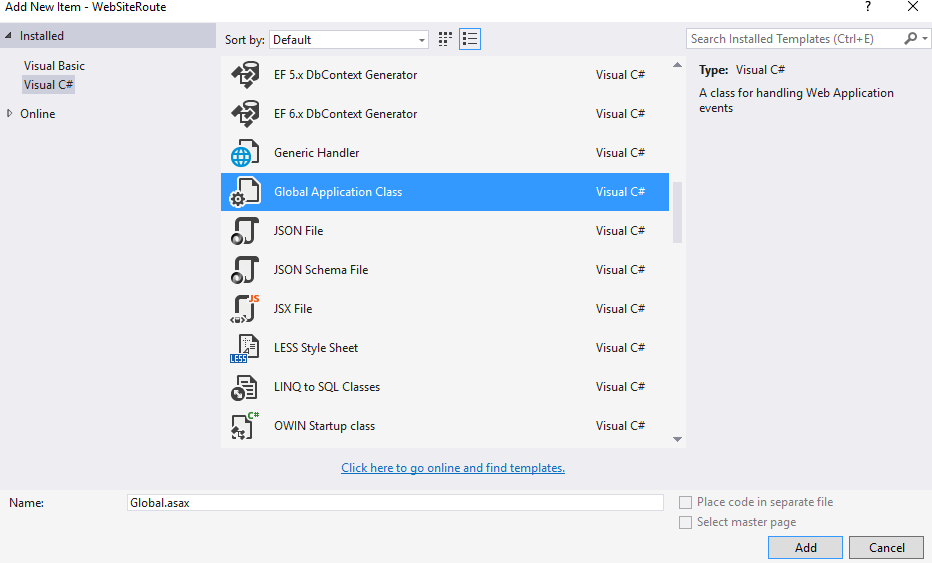
Step 2: Add Global Application class 'Global.asax'.

 Add Global Application class 'Global.asax'.

Step 3: Add reference System.Web.Routing in your project.

Add reference System.Web.Routing

Step 4: Open global.asax file and add the following code in 'Application_Start'

void Application_Start(object sender, EventArgs e)
{
    // Code that runs on application startup
    System.Web.Routing.RouteTable.Routes.MapPageRoute("Home","Home/Index","~/Default.aspx");
    System.Web.Routing.RouteTable.Routes.MapPageRoute("About","Home/About-WDI","~/About.aspx");
}
C#


 RouteTable

Here we are going to use RouteTable for Routing url, RouteTable.Routes.MapPageRoute method ask for 3 parameter, that is 'routeName', 'routeUrl' and 'physicalFile' rather than calling Default.aspx, user can call Home/Index.

Now run the application and enter url like 'localhost:/Home/Index' it will automatically invoke Default.aspx page.

routing in mvc

Same way call Home/About-WDI as in the following screenshot,

routing in mvc

Routing in ASP.NET MVC

Routing in MVC is easy, here we have Route.Config.cs file in App_Start Folder, You can define Routes in that file,

By default route is: Home controller - Index Method. 

// default Route
routes.MapRoute(
      name: "Default",
      url: "{controller}/{action}/{id}",
      defaults: new { controller = "Home", action = "Index", id = UrlParameter.Optional }
C#

routes.MapRoute has attributes like name, url and defaults like controller name, action and id (optional).

Now let us create one MVC Application and open RouteConfig.cs file and add the following custom route. 

// Custom Route
routes.MapRoute(
  name: "about",
  url: "Home/About-WDI",
  defaults: new { controller = "Home", action = "About", id = UrlParameter.Optional }
);
C#

It will invoke 'Home' controller 'About' Action Method.

Routing in ASP.NET MVC 

So for example if user hits url : 'localhost:/Home/About-WDI' it will invoke Home controller 'About' Action Method.

Routing in ASP.NET MVC

Parameter Id is optional here, it can be used while working with id Field like Home/editProduct/3

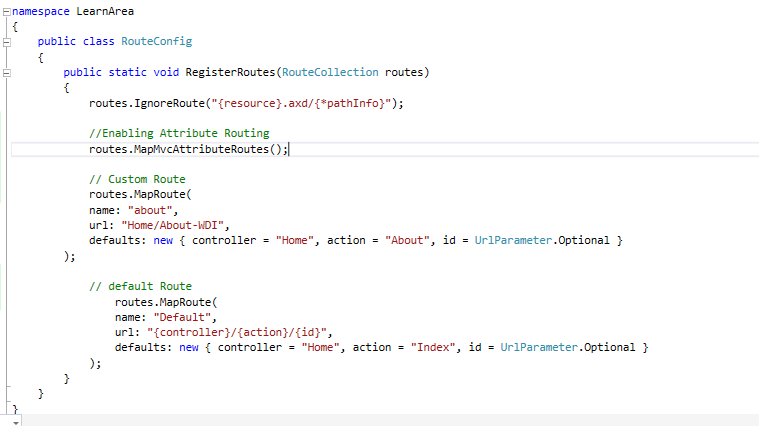
Enable Attributes Routing

You can also Enable Attributes routing by writing the following code in Route.config.cs file.

//Enabling Attribute Routing
routes.MapMvcAttributeRoutes();
C#

Enable Attributes Routing 

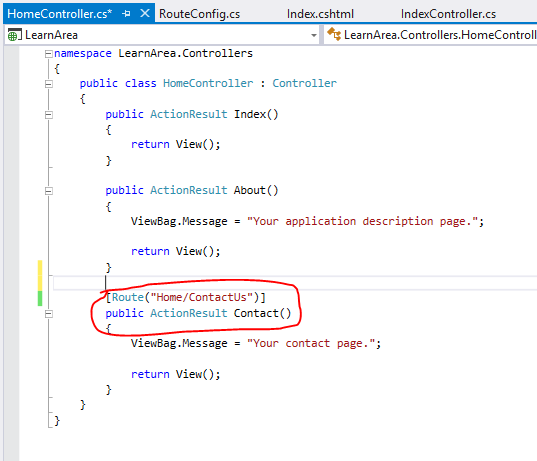
Now rather than writing and managing Routes from Route.config you can manage routes from Controller. As in the following screenshot we have added [Route("Home/ContactUs")] above Contact() ActionResult.

[Route("Home/ContactUs")]
public ActionResult Contact()
{
    ViewBag.Message = "Your contact page.";

    return View();
}
C#

Attributes Routing 

Now run your application and enter url like: 'localhost:/Home/contactUs' invokes Contact Method.

Enable Attributes Routing

Hope you like this article. Same way if you are working with areas then you can manage the routes from AreaRegistration.cs file.