Wednesday, 13 November 2024

Azure Table Storage Using Azure Storage Explorer

 Microsoft provides Azure Storage Explorer and Azure Storage Emulator tools for developers who want to test and use storage accounts and services without getting a paid Azure subscription. In this article, I will discuss how to use Azure Table Storage using Development Storage Account, which is free.

Installation Process

Download Microsoft Azure Storage Explorer from the below URL

https://azure.microsoft.com/en-in/features/storage-explorer/

Download Microsoft Azure Storage Emulator - v5.8 (please download v5.8 version only)

https://azure.microsoft.com/en-in/downloads/

Key Point - Microsoft Azure Storage Explorer and Microsoft Azure Storage Emulator both should be active or running.

Start Explorer and Emulator

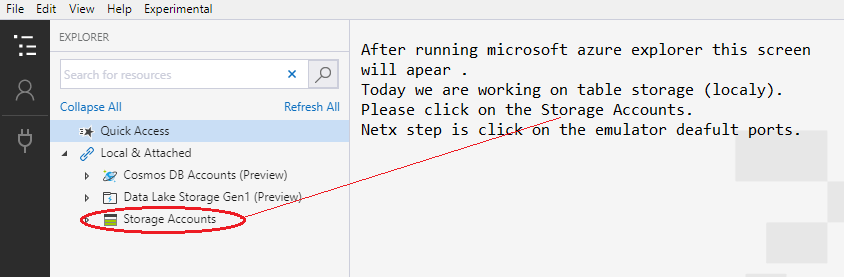
First, run your Explorer and Emulator. Please see the below snapshot; this will be your explorer.
What is Azure Table Storage?

Azure Table storage stores large amounts of structured data. The service is a NoSQL datastore which accepts authenticated calls from inside and outside the Azure cloud. Azure tables are ideal for storing structured, non-relational data.

How To Create Azure Table storage?

Two Ways:

  1. In Azure Storage Explorer, Right-click on Table and select create table option, in text box enter your table name. Please refer to the below figure.

    Key Note:- table name should be in lowercase.
     
  2. We can create through program instruction also.

For Programing, What Things Are Required? 

The below namespace is required so please run the below NuGet command in your solution.

using Microsoft.WindowsAzure.Storage;
using Microsoft.WindowsAzure.Storage.Table;
C#

Click On Tools => Hover On => Nuget Package Manager and select package manager console

Execute the below command.

Install-Package WindowsAzure.Storage -Version 9.3.3
HTTP

This will be the default credentials and we are storing at the web config file.

DefaultEndpointsProtocol=http;
AccountName=devstoreaccount1;
AccountKey=Eby8vdM02xNOcqFlqUwJPLlmEtlCDXJ1OUzFT50uSRZ6IFsuFq2UVErCz4I6tq/K1SZFPTOtr/KBHBeksoGMGw==
HTTP

Please add the below key in webconfig, connection string section.

<connectionStrings>
   <add name="azurestorageconfigurationkey" connectionString="DefaultEndpointsProtocol=http;AccountName=devstoreaccount1;AccountKey=Eby8vdM02xNOcqFlqUwJPLlmEtlCDXJ1OUzFT50uSRZ6IFsuFq2UVErCz4I6tq/K1SZFPTOtr/KBHBeksoGMGw==" providerName="System.Data.SqlClient"/>
</connectionStrings>
Markup

Add the necessary using statements,

using Microsoft.WindowsAzure.Storage;
using Microsoft.WindowsAzure.Storage.Table;
using System.Threading.Tasks;
C#

Create Table

Get a CloudStorageAccount object that represents your storage account information.

Use the following code, using the name of your storage account and the account key, which you can find in the storage connection string in the webconfig file. 

CloudStorageAccount storageAccount = CloudStorageAccount.DevelopmentStorageAccount;
string connectionString = ConfigurationManager.ConnectionStrings["azurestorageconfigurationkey"].ToString();
C#

Get a CloudTableClient object to reference the table objects in your storage account.

CloudTableClient tableClient = storageAccount.CreateCloudTableClient();
CloudTable studentTable = tableClient.GetTableReference("studenttable");
C#

To create the Azure table, create an async method and within it, call CreateIfNotExistsAsync(),

await studentTable.CreateIfNotExistsAsync();
C#

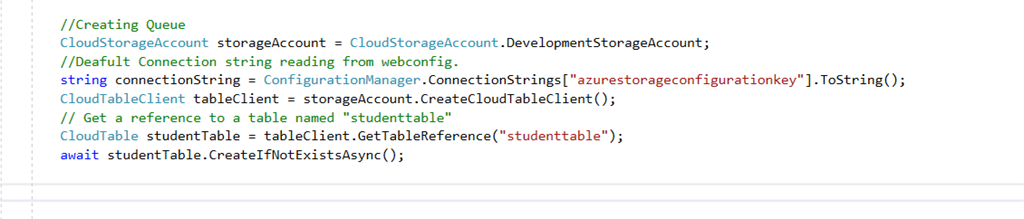
Please find the bellow figure for code implimentation.
 

Add An Entity(data) To A Table

To add an entity to a table, you create a class that defines the properties of your entity. The following code defines an entity class called StudentEntity that uses the student's "registration number" as the row key and colleage_code_as_partitionkeyvalue as the partition key.

Code Snippet For StudentEntity  Class 

Public class StudentEntity: TableEntity {
    public StudentEntity(string RegistrationNumber, string colleage_code_as_partitionkeyvalue) {
        this.partitionkey = colleage_code_as_partitionkeyvalue);
    this.Rowkey = RegistrationNumber;
}
public StudentEntity() {}
public string StudentName {
    get;
    set;
}
public string Colleage {
    get;
    set;
}
public string Branch {
    get;
    set;
}
C#

Before adding an entity to the table let's discuss two important topics. 

PartitionKey

In Table Storage, you have to decide on the PartitionKey yourself.

In essence, you are responsible for the throughput you’ll get on your system.

If you put every entity in the same partition (by using the same partition key), you’ll be limited to the size of the storage machines for the amount of storage you can use. Plus, you’ll be constraining the maximal throughput as there’s lots of entities in the same partition.

Should you set the PartitionKey to the same value for every entity stored? No. You’ll end up with scaling issues at some point.

RowKey

The RowKey property stores string values that uniquely identify entities within each partition. The PartitionKey and the RowKey together form the primary key for the entity.

We can insert entities two ways,

  1. single entity insert
  2. batch of entity insert

Single Entity Insert
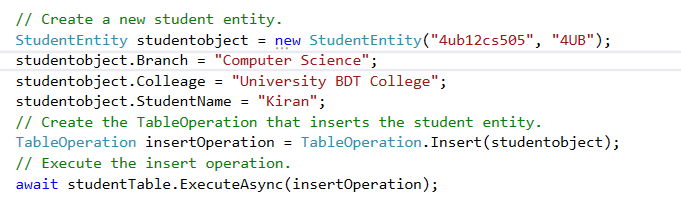
TableOperation - It is class and it Represents a single table operation.

Insert - Creates a new table operation that inserts the given entity into a table.

ExecuteAsync - Initiates an asynchronous operation that executes an asynchronous table operation.

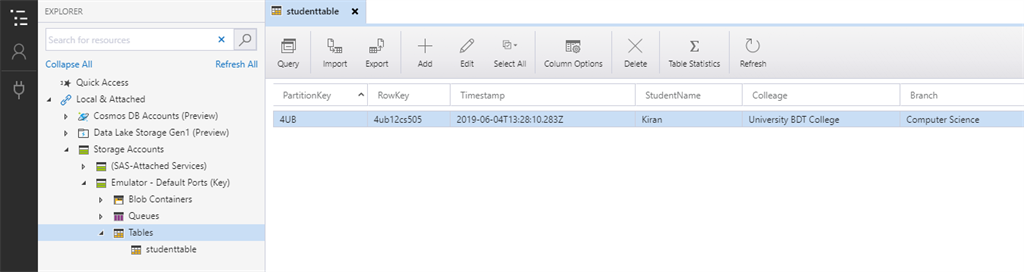
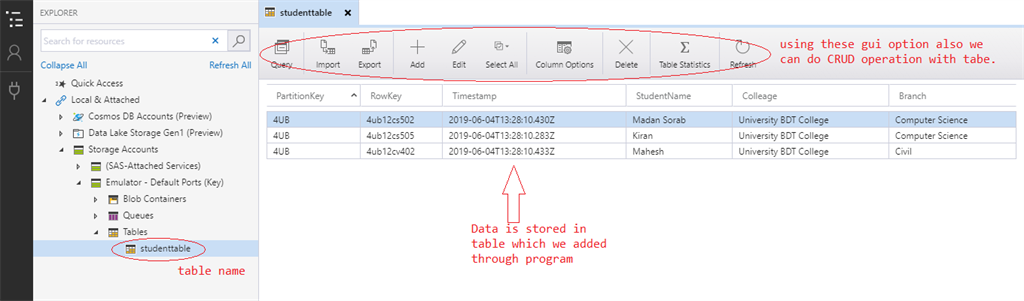
Please refer to the below figure, whatever we inserted into entity is stored under the student table.
Batch Of Entity Insert 
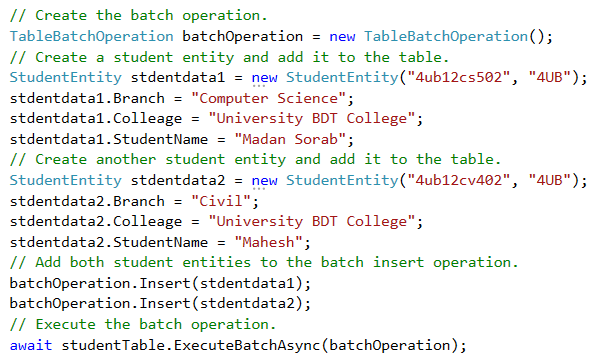
 

TableBatchOperation

Represents a batch operation on a table. Batch operation is a collection of table operations that are executed by the Storage Service REST API as a single atomic operation, by invoking an Entity Group Transaction.

A batch operation may contain up to 100 individual table operations, with the requirement that each operation entity must have the same partition key. A batch with a retrieve operation cannot contain any other operations. Note that the total payload of a batch operation is limited to 4MB.

Insert the specified entity into a table.

Please refer to the below figure for output. In the below figure observe that entities are stored properly.
Get All Of The Entities Using Partition Key

To query a table for all of the entities in a partition, use a TableQuery object. The following code example specifies a filter for entities where '4UB' is the partition key. This example prints the fields of each entity in the query results to the console.

Get A Single Entity
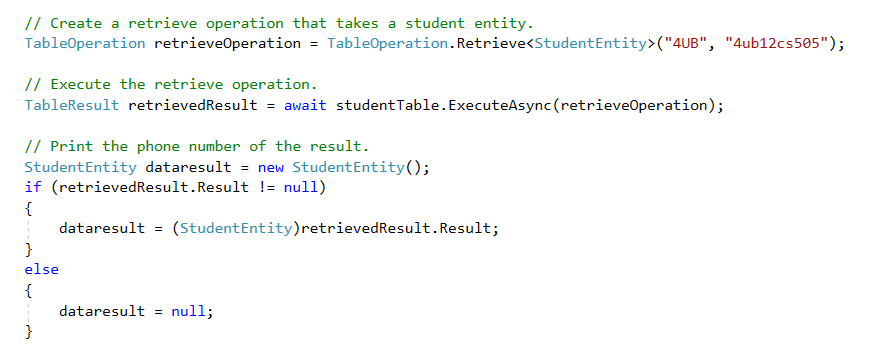
You can write a query to get a single, specific entity. The following code uses a TableOperation object to specify a student registration number '4ub12cs505'. The method returns just one entity, rather than a collection, and the returned value in TableResult. A result is a StudentEntity object.

Specifying both partition and row keys in a query is the fastest way to retrieve a single entity from the Table service.

Delete An Entity
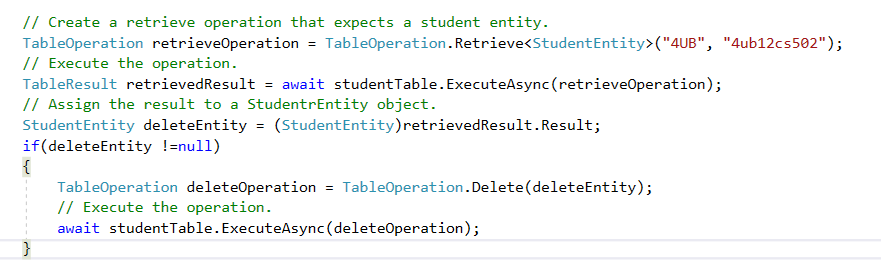
You can delete an entity after you find it. The following code looks for and deletes a student entity register number "4ub12cs502".

Summary

In this blog, we have discussed the below things,

  • Installation of Azure storage explorer and Azure storage emulator.
  • Create an Azure storage table.
  • Add an entity(data) to a table
  • Get a single entity
  • Get all of the entities using partition key
  • Delete an entity

Code Snippet

//Create Storage Account:-
CloudStorageAccount storageAccount = CloudStorageAccount.DevelopmentStorageAccount;
string connectionString = ConfigurationManager.ConnectionStrings["azurestorageconfigurationkey"].ToString();
CloudTableClient tableClient = storageAccount.CreateCloudTableClient();
CloudTable studentTable = tableClient.GetTableReference("studenttable");
await studentTable.CreateIfNotExistsAsync();
//Create a new student entity, single object or row insertion to the table.
StudentEntity studentobject = new StudentEntity("4ub12cs505", "4UB");
studentobject.Branch = "Computer Science";
studentobject.Colleage = "University BDT College";
studentobject.StudentName = "Kiran";
TableOperation insertOperation = TableOperation.Insert(studentobject);
await studentTable.ExecuteAsync(insertOperation);
//Create the batch operation
TableBatchOperation batchOperation = new TableBatchOperation();
StudentEntity stdentdata1 = new StudentEntity("4ub12cs502", "4UB");
stdentdata1.Branch = "Computer Science";
stdentdata1.Colleage = "University BDT College";
stdentdata1.StudentName = "Madan Sorab";
StudentEntity stdentdata2 = new StudentEntity("4ub12cv402", "4UB");
stdentdata2.Branch = "Civil";
stdentdata2.Colleage = "University BDT College";
stdentdata2.StudentName = "Mahesh";
batchOperation.Insert(stdentdata1);
batchOperation.Insert(stdentdata2);
await studentTable.ExecuteBatchAsync(batchOperation);
//Construct the query operation for all student entities where //PartitionKey="4UB". :-
TableQuery < StudentEntity > query = new TableQuery < StudentEntity > ().
Where(TableQuery.GenerateFilterCondition("PartitionKey", QueryComparisons.Equal, "4UB"));
TableContinuationToken token = null;
do {
    TableQuerySegment < StudentEntity > resultSegment = await studentTable.ExecuteQuerySegmentedAsync(query, token);
    token = resultSegment.ContinuationToken;
    foreach(StudentEntity entity in resultSegment.Results) {
        Console.WriteLine("{0}, {1}\t{2}\t{3}", entity.PartitionKey, entity.RowKey, entity.StudentName, entity.Branch);
    }
}
while (token != null);
//Create a retrieve operation that takes a student entity.
TableOperation retrieveOperation = TableOperation.Retrieve < StudentEntity > ("4UB", "4ub12cs505");
TableResult retrievedResult = await studentTable.ExecuteAsync(retrieveOperation);
StudentEntity dataresult = new StudentEntity();
if (retrievedResult.Result != null) {
    dataresult = (StudentEntity) retrievedResult.Result;
} else {
    dataresult = null;
}
//Delete Entity:
TableOperation retrieveOperation1 = TableOperation.Retrieve < StudentEntity > ("4UB", "4ub12cs502");
TableResult retrievedResult1 = await studentTable.ExecuteAsync(retrieveOperation1);
StudentEntity deleteEntity = (StudentEntity) retrievedResult1.Result;
if (deleteEntity != null) {
    TableOperation deleteOperation = TableOperation.Delete(deleteEntity);
    await studentTable.ExecuteAsync(deleteOperation);
}

Difference between PartitionKey and RowKey in Windows Azure Table Storage

 All Windows Azure storage abstractions (Blob, Table, Queue) are built upon the same stack (whitepaper here). While there’s much more to tell about it, the reason why it scales is because of its partitioning logic. Whenever you store something on Windows Azure storage, it is located on some partition in the system. Partitions are used for scale out in the system. Imagine that there’s only 3 physical machines that are used for storing data in Windows Azure storage:

Based on the size and load of a partition, partitions are fanned out across these machines. Whenever a partition gets a high load or grows in size, the Windows Azure storage management can kick in and move a partition to another machine:

By doing this, Windows Azure can ensure a high throughput as well as its storage guarantees. If a partition gets busy, it’s moved to a server which can support the higher load. If it gets large, it’s moved to a location where there’s enough disk space available.

Partitions are different for every storage mechanism:

In blob storage, each blob is in a separate partition. This means that every blob can get the maximal throughput guaranteed by the system.

In queues, every queue is a separate partition.

In tables, it’s different: you decide how data is co-located in the system.

PartitionKey in Table Storage

In Table Storage, you have to decide on the PartitionKey yourself. In essence, you are responsible for the throughput you’ll get on your system. If you put every entity in the same partition (by using the same partition key), you’ll be limited to the size of the storage machines for the amount of storage you can use. Plus, you’ll be constraining the maximal throughput as there’s lots of entities in the same partition.


Should you set the PartitionKey to the same value for every entity stored? No. You’ll end up with scaling issues at some point.

Should you set the PartitionKey to a unique value for every entity stored? No. You can do this and every entity stored will end up in its own partition, but you’ll find that querying your data becomes more difficult. 

RowKey in Table Storage


A RowKey in Table Storage is a very simple thing: it’s your “primary key” within a partition. PartitionKey + RowKey form the composite unique identifier for an entity. Within one PartitionKey, you can only have unique RowKeys. If you use multiple partitions, the same RowKey can be reused in every partition.


So in essence, a RowKey is just the identifier of an entity within a partition.


PartitionKey and RowKey and performance

Before building your code, it’s a good idea to think about both properties. Don’t just assign them a guid or a random string as it does matter for performance.


The fastest way of querying? Specifying both PartitionKey and RowKey. By doing this, table storage will immediately know which partition to query and can simply do an ID lookup on RowKey within that partition.


Less fast but still fast enough will be querying by specifying PartitionKey: table storage will know which partition to query.


Less fast: querying on only RowKey. Doing this will give table storage no pointer on which partition to search in, resulting in a query that possibly spans multiple partitions, possibly multiple storage nodes as well. Wihtin a partition, searching on RowKey is still pretty fast as it’s a unique index.


Slow: searching on other properties (again, spans multiple partitions and properties).


Tuesday, 29 October 2024

Memory Optimized Tables In SQL Server

Server-Side Caching with Memory-Optimized Tables

SQL Server 2014 introduces the In-memory OLTP engine which is fully integrated in SQL Server and allows you to create memory optimized tables. These memory optimized tables have a completely different data and index structure with no locking or latching required when you access the data. This design results in a minimal amount of waiting time and no blocking. Data for the memory optimized tables gets stored in memory in a completely different structure and there are no data pages or index pages or buffer pool for memory optimized tables.

There are two types of indexes which can be created on memory optimized tables, namely a HASH index or RANGE index. A memory-optimized table must always have at least one index, although if you create a primary key on the table, this requirement will be satisfied. You can create up to 8 indexes on a memory optimized table including the one supporting the primary key although no unique index is supported other than the primary key.

All 8 indexes can only be non-clustered indexes. These indexes don't duplicate data, but rather they just point to the rows in the chain. These indexes are not logged and don't get stored on disk.   The indexes are maintained online and created every time during recovery.


 Problem with Caching : if your data is volatile and being updated from multiple clients or applications, then caching can create as many problems as it solves because the data held at each of the individual clients can be different. In that scenario, it becomes difficult to determine what the "right" data is.