Friday, 18 October 2024

Getting data from Azure Service Bus Queues in ASP.NET Core Console


  • Go to Solution and right click on it select Add and select New Project.
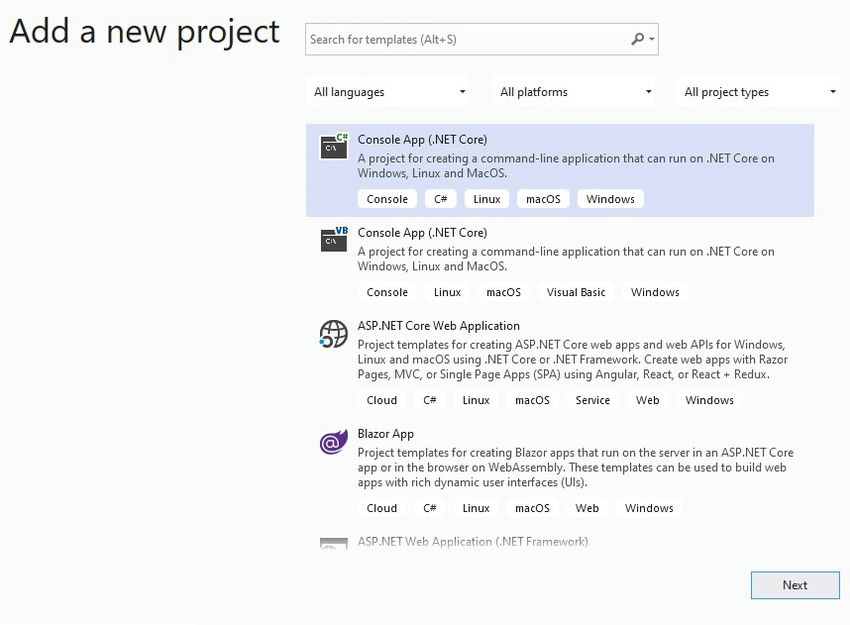
  • Select Console App (.Net Core) and click on Next.
     New Project
  • Give a name to the service and click on Create.
     Create
  • Create a new file called appsettings.json & add the Azure service connection string as below.
    {
      "AppSettings": {
        "QueueConnectionString": "<replace your RootManageSharedAccessKey here>",
        "QueueName": "order-queue"
      }
    }
    JSON
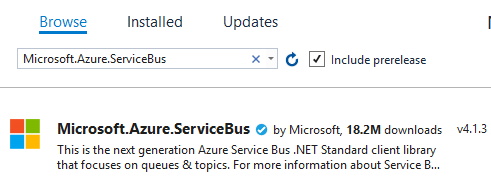
  • First, we have to install the Azure Service Bus NuGet package.
     Azure Service
  • So this service needs to listen to messages from Azure Service bus we can create this as a Windows service. Along with that add the below code to read to the Appsettings from appsettings.json. So create a class called AppSettings.cs as mentioned below.
    public class AppSettings
    {
        public string QueueConnectionString { get; set; }
        public string QueueName { get; set; }
    }
    C#
  • To configure our service first we need to install the below packages.
     Packages
    Microsoft
    Wnidow
  • After that add the below code in `program. cs` to configure our service.
    class Program
    {
        static void Main(string[] args)
        {
            IServiceCollection serviceDescriptors = new ServiceCollection();
            Host.CreateDefaultBuilder(args)
                .UseWindowsService()
                .ConfigureHostConfiguration(configHost =>
                {
                    configHost.AddJsonFile("appsettings.json", optional: false, reloadOnChange: true).Build();
                })
                .ConfigureServices((hostContext, services) =>
                {
                    var appSettingsConfig = hostContext.Configuration.GetSection(nameof(AppSettings));
    
                    services.AddOptions();
                    services.Configure<AppSettings>(appSettingsConfig);
                    services.AddSingleton(appSettingsConfig);
                }).Build().Run();
        }
    }
    C#
  • Now the next part is to create Background service to listen to messages. So create a class called CraeteOrderHandler.cs and inherit it with class `BackgroundService`. Now override the `ExecuteAsync` and `StopAsync` method of BackgroundService class.
    using System;
    using System.Text;
    using System.Threading;
    using System.Threading.Tasks;
    using Microsoft.Azure.ServiceBus;
    using Microsoft.Extensions.Hosting;
    using Microsoft.Extensions.Options;
    
    namespace OrderService
    {
        public class CraeteOrderHandler : BackgroundService
        {
            private readonly AppSettings _appSettings;
            private IQueueClient _orderQueueClient;
    
            public CraeteOrderHandler(IOptions<AppSettings> appSettings)
            {
                _appSettings = appSettings?.Value ?? throw new ArgumentNullException(nameof(appSettings));
            }
    
            public async Task Handle(Message message, CancellationToken cancelToken)
            {
                if (message == null)
                    throw new ArgumentNullException(nameof(message));
    
                var body = Encoding.UTF8.GetString(message.Body);
                Console.WriteLine($"Create Order Details are: {body}");
                await _orderQueueClient.CompleteAsync(message.SystemProperties.LockToken).ConfigureAwait(false);
            }
    
            public virtual Task HandleFailureMessage(ExceptionReceivedEventArgs exceptionReceivedEventArgs)
            {
                if (exceptionReceivedEventArgs == null)
                    throw new ArgumentNullException(nameof(exceptionReceivedEventArgs));
                return Task.CompletedTask;
            }
    
            protected override Task ExecuteAsync(CancellationToken stoppingToken)
            {
                var messageHandlerOptions = new MessageHandlerOptions(HandleFailureMessage)
                {
                    MaxConcurrentCalls = 5,
                    AutoComplete = false,
                    MaxAutoRenewDuration = TimeSpan.FromMinutes(10)
                };
                _orderQueueClient = new QueueClient(_appSettings.QueueConnectionString, _appSettings.QueueName);
                _orderQueueClient.RegisterMessageHandler(Handle, messageHandlerOptions);
                Console.WriteLine($"{nameof(CraeteOrderHandler)} service has started.");
                return Task.CompletedTask;
            }
    
            public override async Task StopAsync(CancellationToken stoppingToken)
            {
                Console.WriteLine($"{nameof(CraeteOrderHandler)} service has stopped.");
                await _orderQueueClient.CloseAsync().ConfigureAwait(false);
            }
        }
    }
    C#
  • ExecuteAsync() method calls when service starts so we have setup a queue client object and also registered Handle method to listen to messages.
  • In StopAsync() method we close the queue client connection.
  • In Handle() method we just extract body from messasge which contains our actual data and just print it in console.
  • After that let's register our hosted service by adding below line into `ConfigureServices` method in Program.cs class.
    services.AddHostedService<CraeteOrderHandler>();
    C#
  • So let's build and run the service to listen to messages. Start order web api and send message to queue which our OrderService going to listen to.
    OrderService
    Web API

Conc

Friday, 20 September 2024

How To Encrypt an AppSettings Key In Web.config

 Sometimes we come across a scenario where we need to encrypt a sensitive key in appSettings section in Web.config file. This blog demonstrates the  steps to encrypt a key and read the respective key in an ASP.NET application.

 
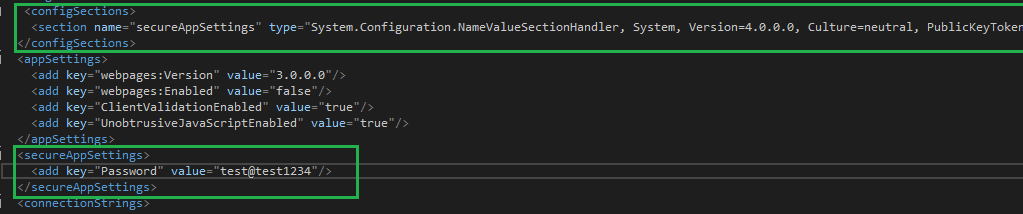
I have an appsettings key that is being called from .NET application. Before we are encrypting appsettings key in web.config.
 
How To Encrypt a AppSettings Key In Web.config

Step 1 - Adding a section in configSections in web.config
  1. <configSections>
  2. <section name="secureAppSettings" type="System.Configuration.NameValueSectionHandler, System, Version=4.0.0.0, Culture=neutral, PublicKeyToken=b77a5c561934e089" />
  3. </configSections
Step 2 - Add secureAppSettings section under configuration
  1. <secureAppSettings>
  2. <add key="Password" value="XXXXXXXX"/>
  3. </secureAppSettings>
How To Encrypt a AppSettings Key In Web.config 
 
Step 3 - Execute command from command prompt to encrypt secureAppSettings section
 
Open command prompt and execute the below commands.
 
cd C:\Windows\Microsoft.NET\Framework\v4.0.30319
aspnet_regiis.exe -pef "secureAppSettings" "your application web config path" -prov "DataProtectionConfigurationProvider"
 
How To Encrypt a AppSettings Key In Web.config
 
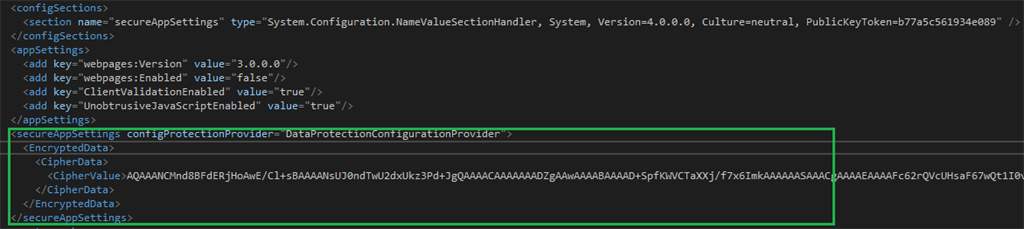
After execution of the above command, secure app settings section encrypted as below.
 
How To Encrypt a AppSettings Key In Web.config 
 
Step 4 - Accessing appsettings key from .NET code
 
To access the encrypted key value in code, we can write it like below.
  1. using System.Collections.Specialized;
  1. var passwordValue = "";
  2. var section = System.Web.Configuration.WebConfigurationManager.GetSection("secureAppSettings") as NameValueCollection;
  3. if (section != null && section["Password"] != null)
  4. {
  5. passwordValue = section["Password"];
  6. }
How To Encrypt a AppSettings Key In Web.config 
 
Excellent! We successfully encrypted to a key in appsettings in web.config. Similarly, we can do the same steps while deploying a Web application to IIS.